Friday, March 13, 2009

Quicksilver

Sometimes we want our students to be able to REALLY see a message. Quicksilver can help us do that. Look at this image. See how the word 'quicksilver' really pops out at you?

Want to see how to do this?


The following video explains how to download and set up Quicksilver so you can create those large easy to read messages on your screen, too. Although there are many other uses for Quicksilver, this post discusses the 'large type' effect you see in the images here.

http://screencast.com/t/PyEHKMjh

You can download Quicksilver from www.blacktree.com or just Google "Quicksilver for Mac". It will be the first or second hit. Download and set it up as shown in the video. I hope you enjoy it as much as I do!

Wednesday, March 11, 2009

Mouseposé

Some teachers have purchased Mouseposé from Boinx Software and have asked me to create a tutorial on how to use it. So here it is: Mouseposé Tutorial.

Mouseposé highlights the screen area around the mouse pointer and visualizes keystrokes and mouse clicks. For more information about Mouseposé, go to www.boinx.com.

This program is not free. I am posting this tutorial by request.

Wednesday, March 4, 2009

Helpful Resources

By now you are probably using your document camera daily and other teachers in your building are asking and hopefully getting document cameras. Here are some helpful links that will give teachers ideas to continue to use the document camera in many new ways.

eThemes Classroom Use of Document Cameras
http://www.emints.org/ethemes/resources/S00002162.shtml
Be sure to check out the one titled: 101 Ways Teachers Use Document Cameras

Monday, January 12, 2009

Avervision Document Camera Alert

If you have received a new Mac computer or you have updated your Mac OS to 10.5.6 you might experience difficulty with the Avervsion software on your computer. We are finding that with Mac OS 10.5.6 there have been freezes or problems with the software working and loading with the Avervsion Document Camera.

There is a beta updated version (2.7.2.0005) of the Avervision software that you can download at:
http://www.avermedia.com/avervision/Support/DownloadDetail.aspx?ID=16


Reminder: You only need to use the Avervsion software on your computer when you want to record or capture video from the document camera, otherwise just use the camera in the camera mode.

Friday, December 12, 2008

Creating Forms in Google Spreadsheets

Google Spreadsheets has included the amazing ability to create an online form. These forms can be used many ways:
  • Generate feedback
  • Conduct a needs assessment
  • Quiz your students
  • More
Once a form is created, it can be displayed as a stand-alone web page or even embedded in a wiki page or blog post (as I've done below).


To learn how to create forms with Google Spreadsheets, please click here.

This post is dedicated to the fine teachers at Quail Hollow. :)

Monday, December 8, 2008

Embedding a Slideshow in Your Blog Post

Would you like to embed a slideshow directly inside of your blog post? Not on the slide as a gadget, but right inside of your post? This post discusses exporting images from iPhoto into a Picasa web album and then embedding a Picasa web album slideshow into a blog.

Before you can export images from iPhoto to a Picasa web album, you need do two things:
  1. You need to to download and install the Picasa Web Albums Uploader. (http://picasa.google.com/mac_tools.html)
  2. You need to create a Picasa account. You will be prompted to do so after installing the Picasa Web Album Updater.
After you have Picasa Web Albums Uploader installed, you use the following directions to embed a slideshow right into your blog post.

DIRECTIONS
1. Download your photos into iPhoto
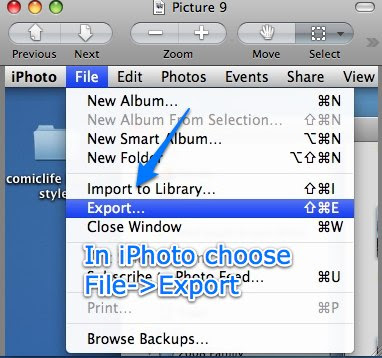
2. Choose images to export, then select File→Export

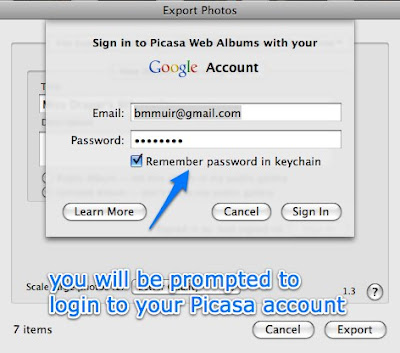
3. You will be prompted to sign onto your Picasa Web Albums account

4. Click on Export to export the album to Picasa Web Albums.
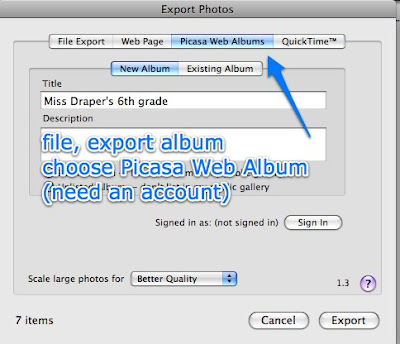

  • You will be prompted to name the album and to choose to export the images to a new or existing Picasa web album.
  • You can edit the album in Picasa Web Album (album properties (private or public) album name, captions, order, delete, etc)
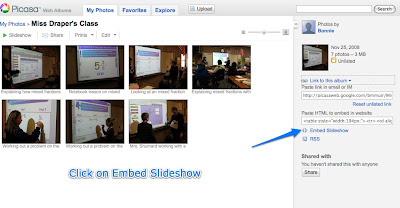
5. Choose an album, click “Link to this album”

(Click on the image to see the largest version)

6. Click on “Embed Slideshow


7. Select viewing options, Copy the HTML code that Picasa generates
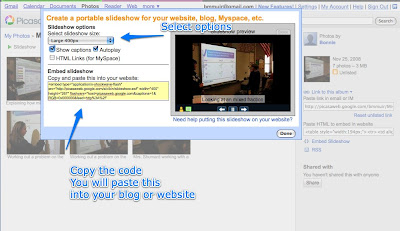

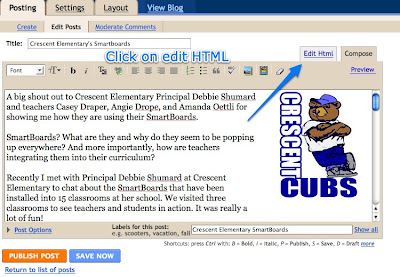
8. Create a blog post, click on Edit HTML
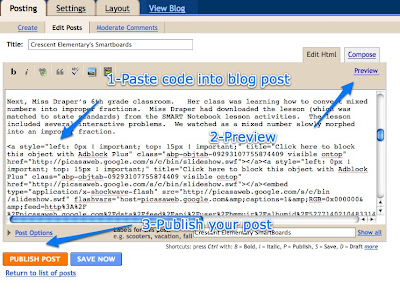
9. Paste code, Preview, Publish.
Special Note: I keep my images of students in private web albums, not public. You can choose the option to store in a private or public web album each time you upload images to your Picasa web albums.

Friday, December 5, 2008

The Educator's Guide to the Creative Commons

[Cross-posted at Drape's Takes]

As not every teacher understands how to implement the Creative Commons into their curriculum, I thought I'd take a minute to explain how I would use it if I was in their shoes.

Step 1: Understand the rules of the Creative Commons.
  • These two videos give a pretty good description of what it is and why creative people like it.


  • The presentation that follows, created by Jessica Coates, also gives an excellent description of how to use Creative Commons in the classroom. Because she has licensed the presentation with a CC-Attribution license, I am able to include her presentation in this blog post (or distribute it anywhere else on the Internet) - without worrying about Fair Use or other copyright restrictions - given that I attribute her as the author of the presentation. These were the terms that she decided upon when she created her license.


Step 2: Use Creative Commons-licensed materials in my curriculum. There is a growing number of resources available online for finding Creative Commons-licensed materials. The list of directories maintained on the Creative Commons wiki, for example, is continually growing. To narrow the list down slightly, I'll list a few of my favorites here:
Step 3: Reuse, remix, and share my Creative Commons-licensed curriculum materials.
  • Remember: The Creative Commons makes it easy to understand when it's OK to reuse, remix, or share new content.
  • My blog is an example of how I share my ideas and materials. I've licensed everything I share here under a CC-Attribution-Share Alike license.

Step 4: Teach my students about Creative Commons while I also teach them about global collaboration, desktop publishing, why creativity is such an essential skill, and my core subject.
  • If I were teaching a core subject today, I would use Flickr to teach math, wikis to teach history, and Voicethreads to teach geography. In doing so, I not only teach the core content, but I teach my students a variety of other essential skills that might not be addressed by the core.
  • If I were teaching a core subject today, I would also use project-based learning far more than the sit-n-git techniques I used to employ. With that in mind, it is any wonder why I love the Creative Commons?
To close, what are your thoughts regarding the Creative Commons? How and why do you use it with your students?

Technorati Tags: